 When the specifications for the Nikon D800 were first released, one of the things that was daunting was the 36.3 megapixel sensor. Who needs a file of that size ultimately sitting on the hard drive with every click of the shutter button? You could buy a different camera for situations when you don’t need a monster image. But the advantage of an SLR is the control over the depth of field and the quality in low light situations. And really, why spend the money on an additional camera if you don’t have to?
The solution? Turn the Nikon D800 into something of a point and shoot camera (albeit a large and heavy one) in addition to the full mega-pixel marvel that it is.
First of all, shooting needs are very different from person to person. For myself, I shoot some stock photography as well as family portraits in studio and on location, but I also shoot a lot of pictures of my family. Do I really need a 36 megapixel image of my daughter taking her first spoonful of rice cereal? The answer, is a resounding and unequivocal “NO!” no matter how cute and precious I might think it is. This is where the settings come in handy.
So here is what I did and maybe it will help you too. I used the Shooting Menu Bank to create four different settings depending on my needs, be it for a client, stock, or just pictures of the family. The main differences in those settings are whether it’s captured as a NEF (raw) or JPEG, image size, and ISO settings. I also used the Custom Settings to create three different settings, one for standard everyday use, one for a hands-free mirror-up for still photography, and one for HDR (high dynamic range) bracketing when there are extreme lights and darks in a scene.
Getting to the Shooting Menu Bank on the D800

Nikon D800 Shooting Menu Bank Settings
[table class=”center” width=”700″ colalign=”left|left|left|left”] [attr style=”width:28%”],Shooting Menu~Bank A[attr style=”text-align: center; font-size: 15px; background-color: Gainsboro; width:18%”],Shooting Menu~Bank B[attr style=”text-align: center; font-size: 15px; background-color: Gainsboro; width:18%”],Shooting Menu~Bank C[attr style=”text-align: center; font-size: 15px; background-color: Gainsboro; width:18%”],Shooting Menu~Bank D[attr style=”text-align: center; font-size: 15px; background-color: Gainsboro; width:18%”] Custom Name[attr style=”font-size: 14px; vertical-align:middle”],RAW FX~ISO100[attr style=”text-align: center; font-size: 14px”],RAW FX~ISO AUTO[attr style=”text-align: center; font-size: 14px”],SNAPSHOTS[attr style=”text-align: center; font-size: 14px; vertical-align: middle”],SNAPSHOTS~FLASH[attr style=”text-align: center; font-size: 14px”] Description[attr style=”font-size: 14px”],Standard full resolution shooting mode for studio or location[attr style=”font-size: 14px”],Full resolution but ISO is allowed to fluctuate as needed to maintain minimal required shutter speed[attr style=”font-size: 14px”],”Point & Shoot setting for indoor and outdoor photos that won’t require extensive editing, cropping, or enlarging”[attr style=”font-size: 14px”],Same as Bank C but keeping the ISO at 400 for flash use[attr style=”font-size: 14px”] Image Quality[attr style=”font-size: 14px”],NEF (RAW)[attr style=”font-size: 14px”],NEF (RAW)[attr style=”font-size: 14px”],JPEG normal[attr style=”font-size: 14px”],JPEG normal[attr style=”font-size: 14px”] Image Size[attr style=”font-size: 14px”],Large[attr style=”font-size: 14px”],Large[attr style=”font-size: 14px”],Medium[attr style=”font-size: 14px”],Medium[attr style=”font-size: 14px”] ISO sensitivity settings~Auto ISO sensitivity control~-Maximum sensitivity~-Minimum shutter speed[attr style=”font-size: 14px”],100~OFF[attr style=”font-size: 14px”],100~ON~-4000~-1/100[attr style=”font-size: 14px”],100~ON~-4000~-1/100[attr style=”font-size: 14px”],400~OFF[attr style=”font-size: 14px”] ,,,,[/table]
Getting to the Custom Settings Menu on the D800
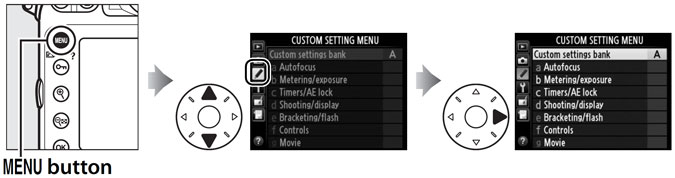
Nikon D800 Custom Settings Bank Settings
[table class=”center” width=”700″ colalign=”left|left|left”] [attr style=”width:19%”],Custom Settings~Bank A[attr style=”text-align: center; font-size: 15px; background-color: Gainsboro; width:27%”],Custom Settings~Bank B[attr style=”text-align: center; font-size: 15px; background-color: Gainsboro; width:27%”],Custom Settings~Bank C[attr style=”text-align: center; font-size: 15px; background-color: Gainsboro; width:27%”],Custom Name[attr style=”font-size: 14px; vertical-align:middle”],STANDARD[attr style=”text-align: center; font-size: 14px”],MIRROR UP[attr style=”text-align: center; font-size: 14px”],HDR BRACKETING[attr style=”text-align: center; font-size: 14px; vertical-align: middle”] Menu Adjustment[attr style=”font-size: 14px”],n/a[attr style=”font-size: 14px”],d4 Exposure delay mode~-set to 2s[attr style=”font-size: 14px”],c3 Self-timer~-Self timer delay-set to 2s~-Number of shots-set to 5~-Interval between shots-set to 0.5s~e5 Auto bracketing set~-AE-set to AE only~e7 Bracketing Order~-set to Under > MTR > Over[attr style=”font-size: 14px”] Notes[attr style=”font-size: 14px”],n/a[attr style=”font-size: 14px”],
 Camera set to S (single frame) on the Release Mode Dial (not MUP)[attr style=”font-size: 14px”],
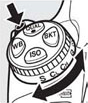
 Use BKT and the Main-command dial to set number of shots and the sub command dial to set the exposure step (the number of shots should match the number set in c3)~
[/table]
Of course all these settings can be changed on the fly without actually using the menu or custom setting bank, but it’s pretty easy when all your settings for a particular situation can be recalled with the push of a couple buttons.
Share this Post